When venturing off the beaten path, the durability and integrity of your vehicle’s tires play a crucial role in ensuring a safe and enjoyable adventure. Tire inspection is an essential practice that every off-road enthusiast should prioritize before and after embarking on rugged terrains. Damage to tires can not only compromise vehicle performance but also pose serious safety risks.
In off-road conditions, tires are exposed to a multitude of hazards including sharp rocks, deep ruts, and abrasive surfaces. These elements can lead to punctures, sidewall cuts, and other forms of wear that may not be immediately visible. Regular tire inspections help identify potential issues early, allowing for timely repairs or replacements, thus extending the life of your tires and enhancing your vehicle’s reliability during challenging drives.
This article will guide you through effective techniques and essential tips for conducting thorough tire inspections, helping you to safeguard your off-road adventures. From visual checks to tactile evaluations, understanding what to look for can make all the difference between a successful expedition and an unfortunate roadside predicament.
Inspecting Tires for Off-Road Damage: Tips and Techniques

When venturing off-road, it is essential to regularly conduct a thorough inspection of your tires to ensure they are in optimal condition. Off-road environments can subject tires to a variety of stresses, which can lead to significant damage. Here are some effective tips and techniques for inspecting your tires for any potential issues.
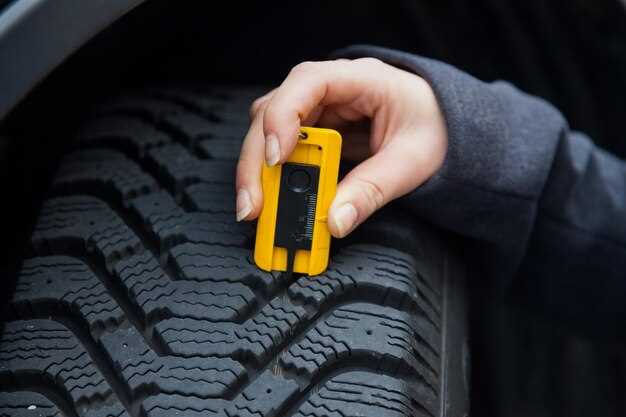
Start your inspection by examining the tread depth. Adequate tread is crucial for maintaining traction on uneven surfaces. You can use a tread depth gauge or the penny test to check if the tread depth is sufficient. A minimum tread depth of 3/16 inch is advisable for off-road use.
Next, carefully inspect the sidewalls for cuts, gouges, or bulges. Off-road terrains often have sharp rocks and debris that can cause sidewall damage. If you observe any abnormalities, it may indicate compromised tire integrity, and the tire should be replaced.
Pay attention to the tire pressure as well. Proper inflation is vital for performance, safety, and longevity. Under-inflated tires are more prone to damage and can lead to poor handling, while over-inflated tires increase the risk of blowouts. Always check the manufacturer’s recommended pressure, especially before hitting rugged trails.
Additionally, check for uneven wear patterns, which can signal poor alignment or suspension issues. Look for signs of wear such as cupping, bald spots, or excessive wear on one side of the tire. Regular rotation of tires can help mitigate uneven wear.
Finally, don’t forget to inspect the valve stems and tire beads for leaks and secure seating. A simple visual inspection can prevent unexpected tire failures during your adventures.
| Inspection Area | What to Look For | Action Required |
|---|---|---|
| Tread Depth | Minimum 3/16 inch | Replace if insufficient |
| Sidewalls | Cuts, gouges, bulges | Replace if damaged |
| Tire Pressure | Recommended PSI | Adjust as necessary |
| Wear Patterns | Uneven wear, bald spots | Check alignment and rotate tires |
| Valve Stems | Leaks or damage | Replace if necessary |
By following these tips and techniques, you can ensure your tires are ready for the challenges of off-road driving, thereby enhancing your safety and performance on the trail.
Identifying Common Signs of Tire Wear After Off-Roading
After an adventurous off-roading experience, conducting a thorough inspection of your tires is essential to ensure continued safety and performance. Off-road conditions can be harsh, leading to various forms of tire wear that may not be immediately visible. Knowing what to look for can help you identify potential issues before they become serious problems.
1. Uneven Tread Wear: One of the most common signs of tire wear is uneven tread patterns. After off-roading, regularly check your tires for any noticeable differences in tread depth across the surface. This could indicate improper alignment or an unbalanced tire, which can be exacerbated by rugged terrains.
2. Cracks and Cuts: Inspect your tires for any visible cracks or cuts in the sidewalls and tread. Off-road obstacles, such as sharp rocks and branches, can cause damage that might compromise the integrity of the tire. Any significant gashes should be addressed immediately.
3. Bulges and Blisters: Look for any bulges or blisters appearing on the tire surface. These deformities can signal internal tire damage, often caused by hitting a hard obstacle. If left unchecked, bulges may lead to blowouts when driving.
4. Tread Separation: Tread separation is a severe issue that occurs when the tread begins to peel away from the tire casing. This can be especially dangerous during high speeds and can lead to complete tire failure. Inspect the edges of the tread for any signs of separation.
5. Excessive Wear on One Side: If one side of the tire shows significantly more wear than the other, this may indicate an alignment issue or uneven weight distribution. Consistent off-roading can accentuate these problems, leading to premature tire wear.
6. Dull Surface Texture: A shiny or smooth tire surface can indicate that the tire has been overused or improperly maintained. Off-road tires should have a rugged, aggressive texture for optimal traction. If the surface appears excessively worn, it may be time for a replacement.
Regular tire inspection after off-roading activities will help you catch these signs of wear early, ensuring your vehicle remains safe and effective on challenging terrain. Always prioritize the health of your tires to enjoy many more off-road adventures.
Step-by-Step Guide to Conducting a Thorough Tire Inspection

Inspecting your tires is crucial for maintaining optimal performance, especially in off-road conditions. Follow this step-by-step guide to ensure a comprehensive tire inspection.
- Gather Your Tools
- Tire pressure gauge
- Tread depth gauge
- Flashlight
- Visual inspection checklist
- Check Tire Pressure
Use the tire pressure gauge to measure the air pressure in each tire. Compare the readings with the recommended pressure specified in the vehicle’s manual.
- Examine Tread Depth
Utilize the tread depth gauge to measure the remaining tread on each tire. A depth of at least 1/8 inch is necessary for off-road conditions.
- Look for Sidewall Damage
Inspect each tire’s sidewalls for cuts, bulges, or punctures. Pay close attention to areas that may have come into contact with rocks or debris.
- Inspect the Tread Pattern
Examine the tread for uneven wear patterns, which may indicate alignment or suspension issues. Look for rocks or stuck debris that could impact performance.
- Check for Cracks and Blisters
Use a flashlight to check for cracks, blisters, or other deformities in the rubber. These can compromise tire integrity and safety.
- Review Valve Stems
Inspect the valve stems for any signs of damage or wear. Ensure that they are not cracked or leaking, as this can lead to air loss.
- Conduct a Final Visual Inspection
Walk around the vehicle and visually assess all tires. Make sure there are no irregularities or abnormalities that may have been missed earlier.
By following this step-by-step guide, you can conduct a thorough tire inspection that will help ensure your safety and enhance your vehicle’s performance in off-road conditions.
Repair Techniques for Common Off-Road Tire Damages
Off-road driving can lead to various tire damages, such as punctures, cuts, and sidewall tears. Proper inspection and timely repairs are crucial for maintaining tire integrity and performance. This section outlines effective repair techniques for commonly encountered off-road tire issues.
For punctures, the first step is to inspect the tire closely. Remove any embedded debris and clean the area surrounding the puncture. A tire plug kit can be used for a temporary repair, which involves inserting a rubber plug into the hole to seal it. For a more permanent solution, it’s advisable to reposition the tire and apply a patch from the inside, ensuring a stronger bond and enhanced durability.
Cuts and slashes on the tread can often be repaired using tire sealant. After cleaning the damaged area, apply the sealant according to the manufacturer’s instructions. If the cut is significant and extends into the inner layers of the tire, professional inspection is recommended, as it may necessitate more extensive repairs or even full tire replacement.
Sidewall damage typically poses a greater risk. Minor abrasions may be addressed with a specialized tire adhesive, but deeper cuts often require replacement, as repairs in this area can compromise structural integrity. Inspections should involve looking for bulges or irregularities that indicate potential sidewall weaknesses.
After completing any repairs, regular inspection of the damaged areas is essential. Check for leaks and monitor tire pressure frequently to detect any changes that may indicate a failed repair. Off-road tires, particularly after repairs, should always be evaluated before embarking on further adventures to ensure safety and reliability.


