

Ensuring the proper function of your vehicle’s braking system is paramount for both performance and safety. Over time, air can enter the brake lines, leading to a spongy brake pedal and decreased braking efficiency. This is not just a minor inconvenience; it poses serious risks on the road. Understanding how to properly bleed your brake lines is essential for any vehicle owner who values their own safety and that of others.
Bleeding brake lines involves the removal of air bubbles and old brake fluid, which can degrade over time. This process helps restore the hydraulic connection vital for effective braking. Although many may choose to rely on a professional mechanic, learning to do this task yourself can save time and provide peace of mind. In this article, we will guide you through each step required to effectively bleed your brake lines, ensuring your vehicle remains safe and roadworthy.
Preparation is key to a successful bleeding process. Having the right tools and knowledge will make the task much more manageable. Whether you’re a seasoned mechanic or a novice car enthusiast, following the correct procedure can lead to improved braking performance and enhance overall vehicle safety. Let’s delve into the essentials of this critical maintenance task.
Understanding the Importance of Brake Bleeding for Safety
Brake bleeding is a critical maintenance procedure that ensures the braking system operates effectively. Over time, air can enter the brake lines, leading to a spongy brake pedal and reduced stopping power. This air infiltration can compromise the hydraulic pressure needed for safe braking performance.
When brake fluid is not properly maintained, moisture can accumulate, which can lead to corrosion within the brake system. This deterioration not only affects the components but also decreases the fluid’s efficacy, further impairing braking performance. Regularly bleeding the brakes removes this moisture and air, ensuring that the system is filled with clean, hydraulic fluid, thus maximizing safety.
In emergency situations, a well-maintained braking system can be the difference between a near miss and a serious accident. Properly bled brakes provide consistent and reliable performance, allowing drivers to react swiftly to unexpected obstacles on the road. Ignoring the need for brake bleeding can result in brake failure, endangering the driver, passengers, and others on the road.
Ultimately, understanding the importance of brake bleeding is crucial for vehicle safety. Routine maintenance, including bleeding the brake lines, should be a priority for all vehicle owners to ensure their vehicles are safe to drive, enhancing overall road safety for everyone.
Step-by-Step Guide to Bleeding Brake Lines with Minimal Tools

Bleeding brake lines is an essential task to ensure your vehicle’s braking system operates effectively. This guide will help you perform this procedure safely and efficiently with just a few basic tools.
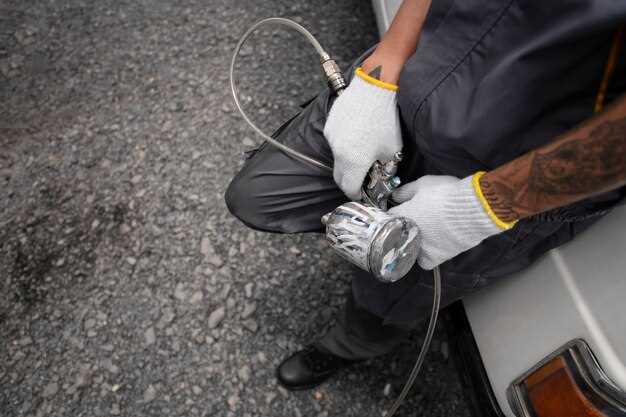
Tools Needed: You will require a brake bleeder kit, a wrench (usually 10mm or 12mm), a clear plastic tube, and a brake fluid container. Keeping an eye on safety, ensure you are working in a well-ventilated area and wearing protective gloves.
Step 1: Check the Brake Fluid Level – Begin by inspecting the brake fluid reservoir to ensure it is adequately filled. Low fluid can introduce air bubbles into the system. Top off with the appropriate brake fluid if necessary.
Step 2: Locate the Bleeder Valve – Identify the brake caliper or wheel cylinder for the brake line you intend to bleed. The bleeder valve is typically located at the top of the brake caliper or wheel cylinder.
Step 3: Prepare for Bleeding – Place the clear plastic tube over the bleeder valve and position the other end in a container to catch the fluid. This setup will help minimize mess and ensure you can observe any air bubbles escaping.
Step 4: Open the Bleeder Valve – Using your wrench, carefully open the bleeder valve by turning it counterclockwise. It’s best to have an assistant in the driver’s seat to pump the brake pedal while you perform the next steps.
Step 5: Pump the Brake Pedal – Instruct your assistant to pump the brake pedal several times and hold it down. This action creates pressure in the brake lines that will help push out any air and old fluid.
Step 6: Close the Valve – With the brake pedal held down, quickly close the bleeder valve. This prevents air from entering the system. Once closed, your assistant can release the brake pedal. Repeat this process until you see clear, bubble-free brake fluid flowing through the tube.
Step 7: Check Fluid Levels Again – Throughout the bleeding process, keep an eye on the brake fluid reservoir. Top off as necessary to avoid drawing air into the system.
Step 8: Repeat as Needed – If you are bleeding multiple brake lines (which is often the case), repeat these steps for each wheel, starting from the furthest wheel from the brake master cylinder and working your way closer.
Step 9: Final Checks – Once you have bled all the necessary lines, ensure all bleeder valves are securely closed. Double-check the brake fluid level and top off if needed. Finally, pump the brake pedal to confirm it feels firm and responsive.
Bleeding your brake lines with minimal tools is achievable and contributes significantly to your vehicle’s safety. With attention to detail and the proper precautions, you’ll ensure an effective and efficient braking system.
Troubleshooting Common Issues During the Brake Bleeding Process
During the brake bleeding process, several issues may arise that can compromise safety and the effectiveness of the brake system. It is crucial to address these problems immediately to ensure proper function.
One common issue is the presence of air bubbles in the brake lines. If you notice a spongy brake pedal, it often indicates trapped air. To rectify this, repeat the bleeding process by ensuring the bleeder valve is properly opened and that you maintain a steady flow of fluid. Monitor for air bubbles during the process and continue until you achieve a consistent stream of brake fluid.
Another problem can occur if the brake fluid reservoir runs low. Depleting the fluid can introduce more air into the system. Always check the fluid level and top it off as necessary throughout the bleeding process. This step is essential to maintaining a continuous supply of fluid and preventing future air locks.
Sometimes, a brake pedal that feels excessively hard can indicate an issue with the master cylinder. If the pedal does not move when you press it, this could mean that the cylinder requires servicing or replacement. Inspect for leaks and perform necessary repairs before proceeding with bleeding the brakes.
Additionally, using the wrong type of brake fluid can lead to complications. Always verify compatibility with your vehicle’s specifications. Using fluid that does not meet the required standards can affect performance and lead to brake failure.
Finally, ensure all connections are secure. Loose fittings can lead to fluid leaks and reduced braking efficiency. Inspect each fitting carefully after bleeding the brakes, and tighten any that may have come undone during the process.


